INSTALLED TEMPERATURE GAUGE - Finally!
#1
 06-08-2009, 10:50 AM

Join Date: Jul 2008
Location: Minot ND.
Posts: 258
Likes: 0
Received 0 Likes
on
0 Posts
Well.....the boredom...and the constant 3+ days rain made my decision for me this wkend.
I've been toying with the idea of installing a temperature gauge on the TRV for a few months now. I've been buying the "parts" for it seperately and was "hung-up" on the TEE configuration. Either it was TOO BIG & HEAVY, or the pcv plastic didn't have enough of a temperature rating (-30F to +140F) for me to rely on.
I bought the mechanical gauge on EBay for $12 in Feb. and a cast TEE and brass fittings around the same time for about $5.
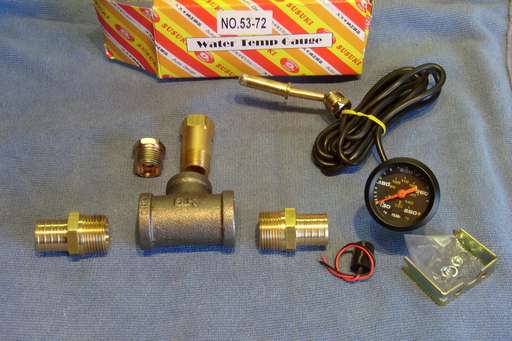
ANOTHER problem I was facing was that the gauge probe sat too low inside the TEE and blocked flow. So I bought a brass "extender" for $(18) but the probe sat too high - DOUGH!
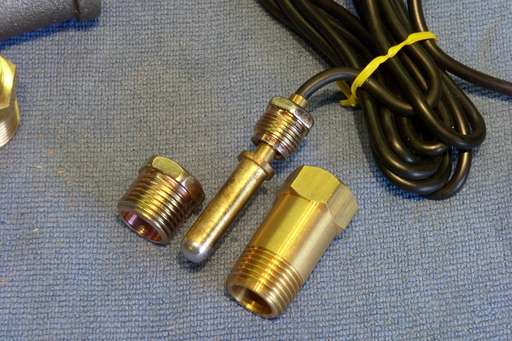
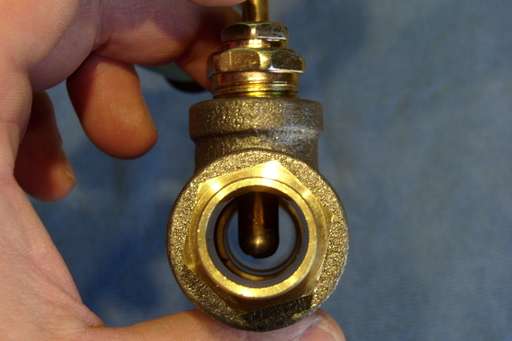
I made another trip to the "box mart" of MENARDS today and managed to "tweek" the weight part abit. Instead of black cast, I found a lighter steel tee and a steel drop-in adapter to fit the temp sender:

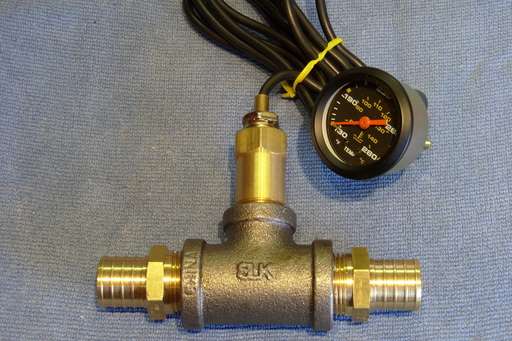
I was seriously considering waiting and buying an electric temp set-up ($120) that I'd found on-line......but I had everything laying out on the bench infront of me.........So....I figured - what the hey.......... And set about installing it. After about 2 1/2 hrs this is what I ended up with:

please note - A WORKING FUEL GAUGE!!


Overall the install wasn't that difficult: - (sorry no set-by-step pics - me bad) ops:
ops:
1. I pulled all the plastic off around the pod and drained off about 1/2 the antifreeze from the waterpump drain screw.
2. After assembling the TEE configuration, I cut into the top radiator hose (guestimated on the amt to cut out) and loosely installed the tee.
3. I then removed the pod and measured center for where I was going to mount it, and used a SMALLER diameter hole saw on my drill to cut thru. I then used my DREMEL with a sanding drum to round out the hole more to ensure a tight fit on the gauge. I also have to CUT a bit of the side of the pod so the rear mounting bracket would fit. (after the fact)
4. After securing the gauge - which fit perfectly! - I ran the sender down thru the TRV frame and wired in the gauge light to come on with the ignition switch in the lights ON position (grey wire in the harness)
5. I then teflon taped the sender probe into the TEE and tightened.
6. I then "SET" the angle of the unit so as NOT to interfere/rub/catch on anything visable- tightened the clamps & leaving SLACK in the probe wire to allow for movement - and zip-tied to the frame
7. Refilled the antifreeze.
8. Re-installed the pod making sure all the additonal wires and probe wire were secured from chafing w/plenty of slack.
9. Fired up the TRV and checked for leaks & to ensure the gauge worked (I did this earlier by putting the sender inside my truck radiator w/the cap off and idleing up to temp).
I I still need some more zip-ties (ran out) to support the unit, or I'm aiming for mechanics wire. I also need to tape off the clamp ends, and re-adjust afew wires (some are still too tight IMHP)
NO LEAKS - and the gauge works. Found out the fan cuts in at +190F
SO total invested:
gauge -$12
tee - $2.65
brass ends x2 - $4.90
clamps x2 - $1.75
misc....oh say - $5
adapters I DIDN'T use - $20
Still a heck of a lot cheaper than $120 for some of the elecrtric gauge configuration(s) I've found on-line.
Now the question is how durable it is. I've got my fingers crossed.
I've been toying with the idea of installing a temperature gauge on the TRV for a few months now. I've been buying the "parts" for it seperately and was "hung-up" on the TEE configuration. Either it was TOO BIG & HEAVY, or the pcv plastic didn't have enough of a temperature rating (-30F to +140F) for me to rely on.
I bought the mechanical gauge on EBay for $12 in Feb. and a cast TEE and brass fittings around the same time for about $5.
ANOTHER problem I was facing was that the gauge probe sat too low inside the TEE and blocked flow. So I bought a brass "extender" for $(18) but the probe sat too high - DOUGH!
I made another trip to the "box mart" of MENARDS today and managed to "tweek" the weight part abit. Instead of black cast, I found a lighter steel tee and a steel drop-in adapter to fit the temp sender:
I was seriously considering waiting and buying an electric temp set-up ($120) that I'd found on-line......but I had everything laying out on the bench infront of me.........So....I figured - what the hey.......... And set about installing it. After about 2 1/2 hrs this is what I ended up with:
please note - A WORKING FUEL GAUGE!!
Overall the install wasn't that difficult: - (sorry no set-by-step pics - me bad)
ops: 1. I pulled all the plastic off around the pod and drained off about 1/2 the antifreeze from the waterpump drain screw.
2. After assembling the TEE configuration, I cut into the top radiator hose (guestimated on the amt to cut out) and loosely installed the tee.
3. I then removed the pod and measured center for where I was going to mount it, and used a SMALLER diameter hole saw on my drill to cut thru. I then used my DREMEL with a sanding drum to round out the hole more to ensure a tight fit on the gauge. I also have to CUT a bit of the side of the pod so the rear mounting bracket would fit. (after the fact)
4. After securing the gauge - which fit perfectly! - I ran the sender down thru the TRV frame and wired in the gauge light to come on with the ignition switch in the lights ON position (grey wire in the harness)
5. I then teflon taped the sender probe into the TEE and tightened.
6. I then "SET" the angle of the unit so as NOT to interfere/rub/catch on anything visable- tightened the clamps & leaving SLACK in the probe wire to allow for movement - and zip-tied to the frame
7. Refilled the antifreeze.
8. Re-installed the pod making sure all the additonal wires and probe wire were secured from chafing w/plenty of slack.
9. Fired up the TRV and checked for leaks & to ensure the gauge worked (I did this earlier by putting the sender inside my truck radiator w/the cap off and idleing up to temp).
I I still need some more zip-ties (ran out) to support the unit, or I'm aiming for mechanics wire. I also need to tape off the clamp ends, and re-adjust afew wires (some are still too tight IMHP)
NO LEAKS - and the gauge works. Found out the fan cuts in at +190F
SO total invested:
gauge -$12
tee - $2.65
brass ends x2 - $4.90
clamps x2 - $1.75
misc....oh say - $5
adapters I DIDN'T use - $20
Still a heck of a lot cheaper than $120 for some of the elecrtric gauge configuration(s) I've found on-line.
Now the question is how durable it is. I've got my fingers crossed.
Last edited by cupsz71; 06-08-2009 at 10:51 AM. Reason: can't spell
#2
09-11-2009, 02:44 PM

#3
09-12-2009, 12:45 AM

Pro Rider
Join Date: Oct 2003
Location: Alaska
Posts: 1,244
Likes: 0
Received 0 Likes
on
0 Posts
#4
09-12-2009, 05:52 PM
No Ruts, No Glory
Join Date: Oct 2004
Posts: 709
Likes: 0
Received 0 Likes
on
0 Posts
#5
09-15-2009, 11:09 AM
Join Date: Jul 2008
Location: Minot ND.
Posts: 258
Likes: 0
Received 0 Likes
on
0 Posts
An FYI though......the gauge has worked FLAWLESS for the past 300+ miles.......until the sender probe lead at the base of the TEE broke off on me last wk. I didn't allow ENOUGH slack in the "loop" to absorb engine/hose vibration.
Sooo...I have a small list of slight "mods" to perform on the TRV and one of them is to REPLACE the entire gauge assembly w/a new one that I re-ordered off of EBAY.
I'll take pics of my "new & improved" install.

Thread
Thread Starter
Forum
Replies
Last Post
Customer Service #1
Arctic Cat
73
05-15-2020 08:46 AM
atv, cap, fuel, gauge, guage, installation, installing, rad, sender, small, tadapter, tee, temp, temperature, trv
Currently Active Users Viewing This Thread: 1 (0 members and 1 guests)